Monday 30 May 2011

Final Exhibition Piece


After much editing and changing ideas I feel my poster clearly shows the function while-loop. The different use of colours and arrows really helps to show this and once the write up is read, I personally think the viewer will get a clear idea of how this function works. I like my chosen metaphor as University students will be able to relate to it. Although if I didn't have to match my poster to my original writ up then I personally feel I could have done a lot better with this project. But overall I have done the best I could and really hope the viewer of my poster understands my work well enough to understand what the function while-loop is used for in processing.

Final Background.

Even with the coloured people background I still felt that the poster looked very plain and simple so to add effect to it I'v decided to add bricks to the background as well. With much editing in PhotoShop I came up with the idea of making the poster look as if it was quite old and on a brick wall. 
This is the brick wall image I have used:

Background For Poster

I have taken the image of the people in a que and edited it in PhotoShop by copying the image and adding different colours. I like this idea for a background as it keeps the idea of a cue going.


Poster Layout Final

After receiving the feedback I did from my friends, I have made many changes to the layout of my poster in order for it to be a lot clearer and less confusing. I feel this layout does that. It is very plain and simple at the moment so I am going to add a background to make it look more like a poster and more appealing to those viewing it. I just have to decide on a background. I feel this layout clearly shows how a while-loop works.

Saturday 28 May 2011

Write Up

For my exhibition piece I have created a poster to explain the function while-loop. A while-loop is a control flow statement that allows code to be executed repeatedly based on a condition. The while-loop consists of a block of code and a condition. The condition is evaluated, and if true, the code runs. This repeats until the condition becomes false. If the condition is false from the beginning then the code never runs.
The metaphor I have chosen to use is one I feel many university students will be able to relate to. The kitchen server at the hostel serves dinner to the students and as long as there is student in line, the server continues to serve. This means the condition is true. The grey circuit of photos on the poster represents this. The black circle with the question mark represents the question - ‘is there students in the line?’ Once there are no students in the line the server stops serving, as the condition has become false. This is represented on my poster by the small red arrow going through the question. And if there were no students in the line from the beginning, the server never begins serving. The red line on the left of my poster shows this, as it skips out the loop.
This example of a loop in code can be modelled as:
·         While (there are students in line)
o   Serve the students.
A while-loop is a very handy function to use when it is needed. It can save a lot of time, and code writing.


*Because I wrote the write up for my poster before I had finished my final poster, I had to fit my final poster to my write up which meant I had some restrictions when deciding on my final layout for my poster.

Changes I am making.

After receiving feedback from my friends, I have made many changes to my poster, including editing my photos in Photoshop to make them clearer to understand. I have made the image of the server at the counter black and white with the server in colour. This makes her stand out of the image. 


Instead of using the images with the students in them, I decided to insert people silhouettes. It makes the server stand out more and it clearly shows the movement of the students. Here is an example of the photos:


I have also created a better way of showing that the question of 'is there students in the line?' These symbols show whether the question is true or if the question.

Poster One

This is my first design for my poster:


Feedback:

Julie Russel - 'I personally find this poster is rather confusing. The layout of the lines doesn't really show what the loop is, and in the photos the server does not stand out in the photos. The colours of the arrows does help give understanding of what way the images go. Although after reading the write up, it does become a lot easier to understand'.

Maria Chang - 'I understood the poster after reading the write up, but until then I didn't really understand what the poster was trying to show. The lights in the photos above the server are very distracting as they are very bright and seem to take over the photo. Without the write up I would not of understood the poster because the layout is quite confusing'.

Hayden Taylor - I agree with the others. Without the write up and the arrows, the poster would not be understandable. The circle at the top of the poster is not needed. It personally just confused me. The write is good as it is easy to understand and definitely explains what a while-loop is.

New Layout of Poster

 I did not realize that our exhibition piece could not contain words so I have changed the layout in order for it to show a loop without having words on the poster.

Monday 23 May 2011

Photos I'm using

Here are just a few of the photos I have taken to use in my exhibition piece:


Sunday 22 May 2011

My Chosen Idea

The idea that I have chosen to make is Idea 3 - The Poster. I chose this because I feel I make can make it show clearly what a while loop is and what it does. Also because of the Metaphor as living in a hostel and being served dinner is a very common experience for many university students.

Monday 16 May 2011

Time Management Plan

I have not yet decided if I am doing a stop motion or a poster but I've made my Time Management Plan to fit both ideas.


Planning and Ideas.

Possible Metaphors for a While-loop:

1) A packager prepares orders by packing items into boxes. If there are no items, he never starts packing. As long as   there are items, he continues to pack. When he runs out of items he stops packing.

2)  A checkout worker serves customers as long as there are customers in line. When there are no customers, she has time to handle previous orders. While" and the condition "there is a customer in line" continues until the condition is no longer true. Then the customer service representative handles previous orders.

3) A dinner server at the hostel serves food to the students. If there are no students in line to begin with, the server never begins serving. As long as there is students in the line, he continues to serve. When the line of students ends he stops serving.

4) Electrons in a light circuit. While the switch is on, the electrons flow to the bulb. As long as the switch is on, the electrons keep flowing. Once the switch is turned off, or the battery runs out, the electrons stop


Top Three Exhibition Ideas:

- Idea One: Metaphor two could be made into a stop motion clip. Using clear photos I could get the message across of what a while-loop is.
Equipment:        Camera
                              Tripod
                              Computer (iMovie)
Costing: There would be no cost in the making of this idea.
Time Management: I could possibly be pushing it to make this idea in time. It will be a lot to get enough photos taken to get the idea of a while-loop across. The editing would also take quite a bit of time. So I would probably not get this idea done in time.


- Idea Two: Metaphor four could be made into a application on Processing. I would include a on/off switch in the app and have electrons flow around a circuit.
Equipment:       Computer
                          Processing
Costing: This idea would not cost anything to make as it would be all done on the computer.
Time Management: I don't think this idea would be possible to make in the amount of time we have. I also don't have the best skills when using the Processing program so would probably struggle a lot to make this idea.


- Idea Three: Metaphor three could be made into either a stop motion or a poster.
Equipment:        Camera
                            Tripod
                            Computer (PhotoShop or iMovie)
                           Paper
                           Printing
Costing: This either would either cost nothing, or less than $10, depending on what option I choose. Making a stop motion wouldn't cost anything and making a poster would cost less than $10 to get printed.
Time Management: This idea would be managable with the amount of time we have left. I would get the main of my idea done during this week until the 22nd of May, then fix up anything needed and have the report done by the 27th.
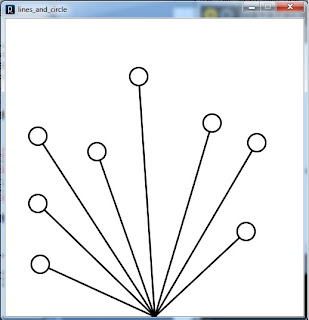
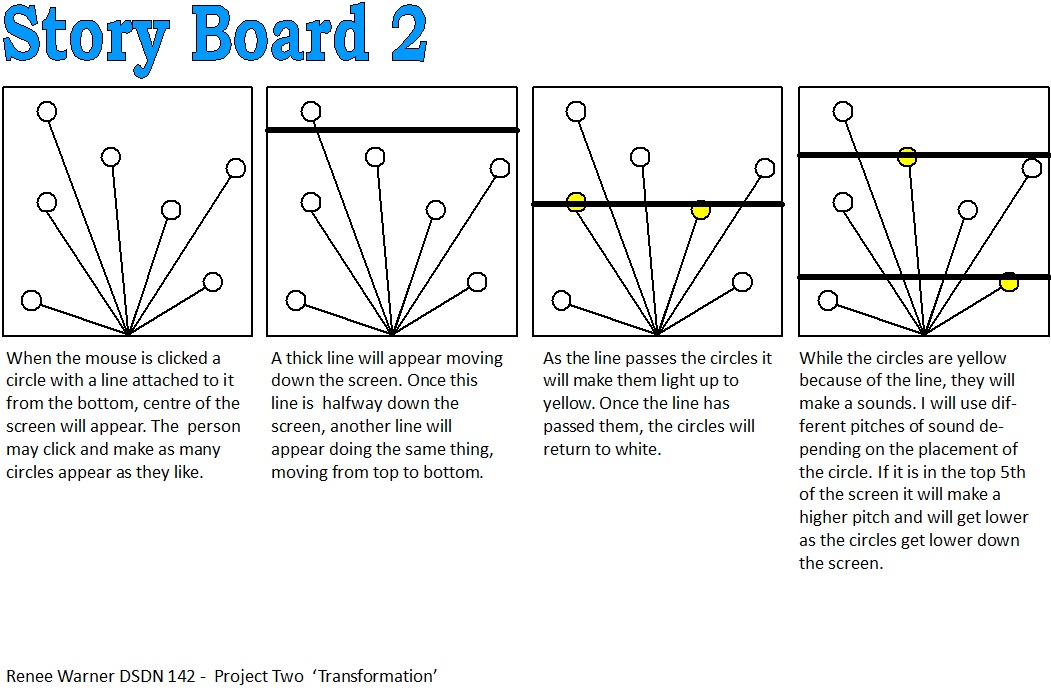


SKETCHES:


Monday 9 May 2011

Analysis and Exploration of Processing Applications.

Because my chosen processing tool is 'while-loop', I typed in 'while-loop' into the search engine on OpenProcessing to find applications people had made that contain a while loop.


I came across this application that I quite liked: 
1- http://www.openprocessing.org/visuals/?visualID=22793 
In this application it simulates a random walker which attaches itself to any structures it touches, which leads to an overall growth in the shape of the structure. The while in this application is whats keeping the walker wandering around looking for a position where it has a neighbor to attach to. This then turns ON its current position and attaches itself to the existing structure it is touching because the condition is TRUE. The while will continually attach the walker to a structure as long as it touches a existing structure. As soon as it doesn't touch or runs out of neighbors to attach to, the while will stop because the condition has become false.


Here is two images, one while its quite small, and one when its grown a little bit.


I have personally struggled with this task. I do understand my function but I find it really difficult to completely understand with it is doing in other peoples applications as i haven't written the code myself and i find decoding other applications quite difficult.

My Chosen Programming Tool - 'While-loop'

The term I have chosen to use for this project is 'While - Loop'. The definition of a while-loop on the processing reference website is: Controls a sequence of repetitions. The while structure executes a series of statements continuously while the expression is true. The expression must be updated during the repetitions or the program will never "break out" of while.


A simpler statement that I understand better is: a While-loop is a control flow statement that allows code to be executed repeatedly based on a given boolean condition. It can be thought of a repeating 'if' statement. The while consists of a block of code and a condition. The condition is evaluated, and if true, the code runs. This repeats until the condition becomes false. 

PROJECT THREE - Coding Expedition

Your task is to choose a basic programming operation and - by creating a metaphor - present it in such a way that the exhibition spectators understand it. You are completely free to choose whatever medium you find appropriate.Your task is to choose a basic programming operation and - by creating a metaphor - present it in such a way that the exhibition spectators understand it. You are completely free to choose whatever medium you find appropriate.
  

Monday 2 May 2011

Evaluation

Over all I am very pleased with how my final application has turned out. It meets all ingredients of sound, visuals and interactive. I find it enjoyable to play with and I hope others do as well.


In the beginning of the project I was really struggling and without the extra tutorial and extra help sessions with the tutors I would not have got as far as I did. They helped me a lot by talking me through different steps while creating my application.


I now have a way better understanding of the Processing Program and I'm slowly learning how it work out codes for myself. I feel the standard of my work has increased a lot from the first project and I now understand how important it is the blog everything as I go.

Transformation Final. URL link to OpenProcessing.

http://www.openprocessing.org/visuals/?visualID=28004 - Project Two. Transformation.


I have uploaded my final application to the OpenProcessing website and have also added it to both the Creative Coding 142 classroom page and the Transformation sub-collection.

Screen Shot of blue circles.


I personally think the colour blue looks much better than the red did. The red stood out just a bit to much and seemed to take the screen over a lot quicker than the blue does. I am glad I made this decision.

Progress during break

After many hours searching online for free sound effects downloads, I came across four that I thought would work together well on my application. I have have to convert the files to mp3s and then add them to my app. Once this is done I would have finished my project and will upload it to my openprocessing account.


I have also decided to change the colour of the circles to blue. I think it looks a lot better on the white background.

Thursday 14 April 2011

Plans after Presentation.

I received some very positive feedback for my project during my presentation. To improve what I have done so far it was suggested to me that I change that sounds my application plays. I totally agree with this and my goal is to find three sounds that fit together a lot better while playing than my 3 sounds do at the moment. I am thinking of using three different instruments e.g guitar, piano and maybe drums. Changing the sounds on my application will help enhance the users enjoyment, and I may even use more than three sounds.

Final Progress Report before Presentation.

Overall I am very pleased with how much I have accomplished for this project considering I was away for the first week due to being sick. Once I got the hang of what I was doing and had my idea finalized, completing the task became less daunting. For my presentation tomorrow I will show my final application, explain some of my ideas and the final stages I went through to get there. I will also explain transformation, which to me is an object beginning as something and ending with different characteristics.  My application shows this through the ellipses and the variations of sizes they go through once being drawn. If I receive any suggestions I will definitely take them into consideration and see what I can do to improve my final application over the mid trimester break. I really hope to improve my grade from the first project and I have spent many hours simply trying to get my head around the different codes used. Without going to the extra tutorial I don't think I would have completed this project. I am very glad that I changed from my very initial idea because to me, it would not have been interactive enough and would not have been so effective as my final application has been.  


My Three Sounds.

I have put my sounds into a video format in order for me to upload them. The one video contains all three sounds that I have created using the GarageBand program on Mac computers.
Here are my three sounds:


Together the sounds work good together, but when many are playing at once I'm unsure whether the sound will be to hard to listen to. If so I may need to change my chosen sounds for my application.

Application without sound.

I have worked out how to make my application have the movements that I wanted it to. Here are a series of screen shots that show the movement of the circles and the transformation they make.


From these three images you can clearly see the transformation each ellipse has during its stages. Firstly when it is just pulsing, and secondly when it has finished making the sound and continues to grow and fill the screen. 
I am very happy with how my application is going so far as it includes both interaction and transformation. 

Going to the extra tutorial on Weds night helped a lot. Ben explained many things in detail which has helped me to get to this stage. 

My plan for adding sound.

For my sound I have the idea of having three different sounds, and as each ellipse is drawn, the program will randomly choose one of my three sounds to play. I will have to carefully choose my sounds tho, as they have to fit together when more than one is playing at once. I am thinking of creating my own sounds from a program that I have on my computer at home. Once I have created each sound I will have to convert them to a MP3 file in order for them to work. After I have created each sound, I will try to upload a sample to my blog. 

Progress Report

After hours of looking up codes and watching tutorials I finally worked out how to make each ellipse draw when click and stay where it was clicked, then draw another one where the mouse is clicked again. Here is a screen shot of what the screen looked like when I had clicked several times: 


I was really happy when I had completed this step, as it felt like I was slowly getting the hang of using Processing and working out which parts of codes meant what.

My next step is to add colour and the pulsing movement to the circles one they have been clicked and drawn. I am now really looking forward to seeing my finished application. I Can't wait to see what I come u with and how my final will turn out.

For my colour choice I am thinking of using red ellipses because I think it looked effective in my first project. It is a very bold colour and makes a clear statement.

Inspiration Image

I came across this image and it gave me the idea that instead of a line moving down the screen to make each circle play a sound, why not make each circle play once it has been clicked and made on the screen. While the sound is playing, I will make the ellipses pulse from bigger to smaller and vice versa (like a ripple expanding, except it will get smaller as well), and once the sound has stopped the circles will just get bigger and fill the screen. All the circles made over top will do the exact same thing. I now just have to work out code to make this happen, which could be quite difficult as I find the program very difficult to use. For design purposes as well, I think this idea will look a lot better on the screen than the line.

Wednesday 13 April 2011

Progress so far.

To begin my application I setup my page size, background colour etc. I then created the circle and line by using void Draw. To control the placement of each line and cirlce I have used the mouseX and mouseY function.

Here is a screen shot of what the code came up with -


I now need to work out how to make each circle be clicked to where I want it to go and stay, because I don't want to circles and line to follow everywhere the mouse goes. Only where it is clicked, is where it should stay.


This is the code for this piece of my application:

void setup(){
 size(500,500);
 background(255);
}

void draw(){
  strokeWeight(3);
  stroke(0);
  smooth();
  line(mouseX,mouseY,250,500);
  ellipse(mouseX,mouseY,30,30);


} 

StoryBoard Two.

After thinking about what trasformation means to me, I decided that I needed to come up with a brand new idea.

This is my second story board and the one I hope to stick with for this project.


I am quite happy with this idea and I hope to make it work on processing. If possible I may add extra effects to it etc.

Thursday 7 April 2011

Applications from Processing that have taken my eye.

http://www.openprocessing.org/visuals/?visualID=8164    -  This is a link to a application called Fish Pond. I really liked this application as it was very simple but I didn't want to stop playing until I knew what happened in the end. When I noticed the fish was growing as it ate more stars the game became a lot more interesting.


http://www.openprocessing.org/visuals/?visualID=4793    - I also liked this application called Cube It. To me it was entertaining and fun because the falling blocks began to move faster as the game went on. I personally could play this game for hours, even though it is very simple and mindless.


Story Board for Project Two - Transformation


This is a copy of my story board. The pictures I have drawn are very simple but when I create my application I will most likely add effects to the background, use colour and many other things in order for my application to be entertaining and interactive to the user.

Mind Map of Three Ideas


This is a copy of my initial ideas for this project.
I have decided to go with my 'Darts hitting target' idea. I feel I can make this a fun application by adding effects to the background. It will be interactive and meet the criteria of the project.

Wednesday 6 April 2011

PROJECT TWO - TRANSFORMATION

Develop a logical concept on how those ingredients can relate to each other. Design an interactive application that reacts to your mouse movement in processing.

Project One Evaluation

What have you learnt so far, what helped and motivated you to learn?
So far I have learnt to use processing with a better understanding of what the different codes mean. I was motivated by the fact I was using a new programme and learning about it as I went. I liked the thought of creating something unique and appealing. I hope to learn more about the programme as I continue to use it.


Is there anything that you want to improve in your next project?
I would like to improve my time management skills for the next project as this would make the whole process of the project less stressful. I would like to get to know the programme I am using a lot better as well before beginning a project. Another improvement I would like to make would be concentrating more during the studio time as this is when I can get help to fully understand what I am doing.

Set yourself a goal and make a plan on how you could achieve this goal.
My Goal for the next project is to create something new and appealing to others. I will achieve this goal by working hard and not finishing the project until I am 100% satisfied that it is to the best standard it can be.

Monday 21 March 2011

Final Submissions. Images of Wall Papers Finals

I could not upload my pdf files to my blog. I tried many times but blogger would not accept the file.

Here are the images of my Final Wall Papers.


Final Submissions. URL Links to Open Processing.

Wall Paper Final Design 1 : http://www.openprocessing.org/visuals/?visualID=24496

Wall Paper Final Design 2: http://www.openprocessing.org/visuals/?visualID=24500

Wall Paper Final Design 3: http://www.openprocessing.org/visuals/?visualID=24502

Wall Paper Final Design 4: http://www.openprocessing.org/visuals/?visualID=24503

My First Four Sketches.

The first ideas I thought of included: friends, family, outdoors, my twin brother, target of design. I wanted to create wallpapers that all related back to something that inspires me everyday by using circles and stripes as my main ways of creating.


MY FOUR SKETCHES:


My first sketch is from the inspiration of my twin brother. The horizontal and vertical stripes represent how we are each very different yet we both meet in the middle no matter what. I kept the use of colour simple as I wanted the stripes to be the dominant part of my image.

My second sketch is inspired by my idea of outdoors. The yellow and black stripes represent the good and bad weather that occurs, the blue star represents that blue sky is always best and the coloured circles falling from the tree represent all the outdoor activities that I enjoy to do. The stripes stand out in this sketch which is what I was after.

My third sketch is from the inspiration of my idea that getting to a final design is a target. I have used the colour red as it symbolises a target. The red gets darker as the target gets closers. The smaller circles coming off the main line represent all the little ideas I get that don't end up working out. I having used stripes in this sketch as I wanted the circles to be the main part.

My fourth sketch is inspired by the idea of friends. The colored circles around the outside represent my friends and how we have all moved away from each other this year, yet we all still keep in touch with each other through many different ways. The stripes through the background show these different ways.


From these four sketches I have decided to create my set by combining sketches three and four. I am going to use black and white stripes with red circles to make up my four wall papers as I think it is better to stick with only using a few colour choices.
My goal to is to create a set of four wallpapers that carry on from each other. They will contain the use of stripes, circles, transparency.
I plan on doing this by learning how to use Processing with better understanding enabling me to create wallpapers that will look appealing.

Inspiration for using stripes and circles.

I came across this image online and the use of stripes and circles really appealed to me. It gave me the idea of using circles and stripes throughout my first four sketches. Although instead of using coloured lines I thought I would stick to using just black and white, and for the circles I would use colour.